Can You Add A 360-Degree Camera To A Ford F-150?
Some Ford F-150s don’t come with a 360-degree camera, which is a letdown if you struggle with parallel parking or just want a better view behind your vehicle.
If your F-150 does come with the camera, you may want to replace it with an aftermarket alternative for better angles.
Luckily, the F-150 allows for a new 360° camera installation regardless of your current setup.
It’s possible to add a 360-degree camera to the Ford F-150; however, the process is highly technical and involves steps with wiring and component deconstruction that aren’t common in other installations. It’s better to have a professional install the camera if you don’t have experience in these areas.
If you’re installing the camera yourself, double-check that the device is compatible with your truck to avoid any issues during installation.
How To Install a 360° Camera in the F-150
The following installation guides cover the four main cameras:
- The front view camera
- The rearview camera
- The left-view camera
- The right-view camera.
Don’t be afraid to get help while installing your cameras to avoid misplacing components or damaging sensitive parts of your truck.
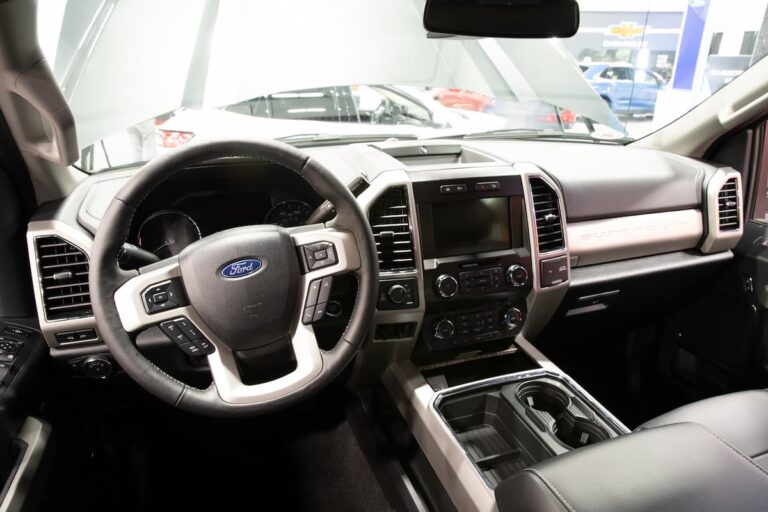
Front View Camera
The factory F-150 front view camera is below the front emblem and on the grille.
Its wires run through the grille, into the engine compartment, and to your SYNC system from the speaker compartment.
Your aftermarket wiring should follow this exact route.
For successful cable routing, you’ll need to make an incision into the bottom of the rubber grommet in the engine compartment.
Cut enough of the rubber for the wire to pass through, but don’t tear the entire component. Pull on it first to make the incision easier.
When inside the cabin, pull down the compartment on the driver’s side.
Run the cable through the grommet, up the harness, inside and over the compartment, and into your SYNC system.
The next step is to access the area below the speaker. Use a plastic panel puller to open the cover and expose the speaker.
You’ll see two 7mm bolts holding the speaker in place. Use a bolt extractor or a similar tool to take them out.
Remove the entire top panel with your hands and unplug the speaker.
The exposed area has wires connecting to your SYNC system, and that’s where you’ll do the rest of the wiring.
Take out the framework supporting your SYNC by removing the 7mm bolts and pulling it out with your hands.
Once done, you’ll see three 7mm bolts on either side of the touchpad. Remove them, take out the screen, and unplug the wires.
The next major step is the wiring, and you should connect the respective terminals of the aftermarket wires to your SYNC system. When done, bundle up these wires with a zip tie.
Next, mount the module that links to the camera with self-adhesive tape. When mounting your module, ensure the USB connector side faces up.
That makes it easy to update the system without disassembling your entire SYNC framework again.
Reverse these steps to put everything back in its place.
Finally, turn on the ignition, activate your camera, access the “Camera” setting on SYNC, and click “Front.”
You’ve installed the camera successfully if an image pops up on the screen.
Rear View Camera
The F-150 rear view or backup camera is on the tailgate, and putting the vehicle in reverse automatically triggers it.
Your screen turns blank if you don’t have it, but with the right tools and wiring, you’ll have it set up in no time.
You’ll install the camera on your tailgate handle. You can buy a handle with a pre-drilled camera pull or modify the current one.
These steps guide you through modifying a tailgate handle.
The first step is to remove this handle. You’ll need a torque wrench and bolt extractor.
Start by opening the tailgate.
You’ll see numerous torques on the inside of the structure. Use your torque wrench to remove them and access the inner panel.
Next, remove the two 10mm bolts holding the handle and pull it from the top. Release the tab from underneath and take out your handle.
The next step is modifying your handle by drilling a camera-sized hole in the center bottom.
Fit your camera into the hole and use epoxy to keep it in place.
Next up is the wiring.
The wire harness from the dashboard to the tailgate is already set up for a backup camera. All you need to do is remove it and replace it with a new one that connects to the camera.
Remove the factory harness by pinching the connector and sliding it off. Thread it off the tailgate by disconnecting the clips holding it.
Next, get under the truck hitch and disconnect the harness connector. Also, disconnect the connector on the tailgate before feeding through the harness and taking it out.
Connect the new harness by retracing these steps.
Return the handle (now with the mounted camera) onto your tailgate by following the removal steps in reverse order.
Once done, clip the camera cable onto the handle’s plastic clip and loop it around the bracket to connect it to the harness adapter.
The final step is securing the two bolts holding the handle and returning the panel to the tailgate. Ensure the torques are secure.
A telling sign of a successful installation is if the new harness doesn’t mess up your tailgate’s locking mechanism.
For the ultimate test:
- Activate the camera by following the manufacturer’s instructions
- Turn on your F-150
- Navigate the rear camera.
An image on the screen is proof that you’ve done everything right.
Side View Cameras
The side view camera installation is by far the most challenging.
You’ll need to disassemble and rearrange several components on your doors to set up the wiring.
The below steps still take you through the process, but you should get professional help whenever possible.
You’ll install your cameras beneath the side mirrors, where the knockout panels are.
If you’ve set up the front view camera, you’ll have pre-wires that don’t connect to anything – they’re for the side view mirrors. You’ll need to pull down the driver’s compartment to access them.
To start, remove the entire door panel to set up the wiring. You’ll need a plastic panel puller and a screwdriver to remove the plastic components.
You’ll also need a bolt extractor to remove the bolts.
Start by pulling out the plastic on the opposite side of the side view mirror. Next, take out the three main 7mm bolts on the panel (two at the bottom and one adjacent to the side view mirror).
Move to the center of the door panel.
There are four 8mm bolts – you’ll need to pull out the two plastic covers to access them.
Use your panel puller to remove the inside cover and your screwdriver to remove the external one.
Once they’re both out, take your extractor and remove these bolts.
Grab the door panel and pull it out. You might need to unplug a few clips depending on your F-150 model.
The next major step is wiring your camera, and this is where you should get professional help if you’re stuck.
Disconnect the two plugs connected to the door boot, as you’ll need to feed your wires through it.
The two plugs may have spare holes that let you feed your wires. If they do, run the camera module’s cables through it. If they don’t, take precautions and disconnect the car battery’s negative terminal before moving on.
You’ll need to drill a couple of holes to pass your cables. One should be next to these factory plugs, and you should do this part from inside the cabin.
The next hole should be underneath the door boot. If you didn’t move it from its initial position before, do so now.
Be extra cautious when drilling to avoid damaging the door, the boot, or the plugs.
Also, loom your wires before feeding them to avoid touching the truck’s sides.
Once done with the drilling, pass the wires through the first hole inside the cabin, then feed them through the second hole.
Pull them through the door panel and to your side view mirror.
Plug in the door boot and put it back after running the cable.
Your loom is likely next to your door boot, and you can seal it to the boot with rubber butyl so it doesn’t hang loose.
The final step is connecting your wire terminals to the camera. Hopefully, you’ve run the cables up the door and into the side view mirror, and they pop up beneath it.
You can use a screwdriver to direct them through the side mirror so they come out on the other end.
Mount your camera onto the mirror’s knockout panel, connect it to the cables, and fix the setup onto the mirror.
Connect the cables on the other end of the wiring to the power and RCA.
To test your camera, turn on the ignition, activate your camera, and navigate to the respective view (left or right).
An image on the screen is proof of success.
Finally, return the door panel, screw everything in place, and repeat this procedure on the other side view mirror.
Conclusion
Installing a 360-degree camera setup in your F-150 isn’t easy. It requires effort and a lot of experience installing truck components.
If you’re an automotive novice, let a professional do it or go through these steps together.
Though it may be expensive, hiring a pro is safer for you and your truck. You may also get a few tips on how to do this type of task in the future.